# Loose Sammlung
# Anleitung zur Anmeldung bei Sharepoint
#### **Vorwort**
Wie Sie alle wissen, werden Sie ab heute keinerlei Dateien mehr lokal bearbeiten können, sondern Ihre Arbeiten verlagern sich ins Internet. Im Vorfeld wurden verschiedene Vorarbeiten ausgeführt und all Ihre Dateien stehen nun online in einem Sharepoint Server bereit. Hier können Sie Dateien auch mit anderen Abteilungen teilen und gemeinsam bearbeiten. Im Laufe des Tages verschwinden auf jedem Computer die Netzlaufwerke auf denen Sie Ihre Dateien bisher abgespeichert haben!
**Um den Zugriff auf die Unternehmensdaten abzusichern, muss jeder Mitarbeiter eine 2-Faktor-Authentifizierung auf dem Smartphone einrichten. Sollten Sie ein neues Smartphone erhalten, müssen Sie sich bitte direkt an mich wenden, da sonst der Zugriff nicht mehr möglich ist. Die Sicherheitsschlüssel lassen sich nicht wie andere Apps auf ein neues Gerät übertragen.**
Jeder Mitarbeiter hat seinen eigenen Account in Form einer E-Mail Adresse. Diese Adresse ist allerdings nicht zum Empfang oder dem Versand von E-Mails gedacht, sondern mehr als Identifikation. Jeder E-Mail Adresse (=Login) besteht aus folgender Form:
In dieser Liste finden Sie Ihre Hoteldomain
**Hotel Name**
**Hoteldomain**
Best Western Hotel Fellbach
bestwestern-fellbach.de
Best Western Hotel Wiesbaden
hotel-wiesbaden.de
Best Western Hotel Kaiserslautern
hotel-kaiserslautern.de
Best Western Hotel München
hotel-arabellapark.de
Best Western Hotel Osnabrück
hotel-osnabrueck.de
Best Western Hotel Bremen
hotel-zurpost-bremen.de
Best Western Hotel Bad-Mergentheim
parkhotel-mergentheim.de
Best Western Hotel Gießen
hotel-steinsgarten.de
Best Western Hotel Brunnenhof
hotelbrunnenhof.com
Best Western Hotel Airport Frankfurt
hotelairport-frankfurt.de
Best Western Hotel Tulln
hotel-tulln.at
Best Western Hotel Linz
hotel-spinnerei.at
Best Western Hotel Hagenberg
parkhotel-hagenberg.at
Best Western Hotel Singen
hotellammsingen.de
Strandhotel Gerken
strandhotel-gerken.de
Parkhotel Wangerooge
parkhotel-wangerooge.de
Wenn Sie nun also als Beispiel Peter Pan heißen und Sie im Hotel in Wiesbaden arbeiten, dann lautet Ihr Login:
**PS: Umlaute wie ö,ä,ü oder ß werden zu oe, ae, ue und ss !**
Als Passwort verwenden Sie bitte genau das selbe, das Sie auch beim Windows Login eingeben!
**Bitte schließen Sie nun alle lokal geöffneten Dateien (Word, Excel, Adobe Reader etc.) und folgen Sie dieser Anleitung!**
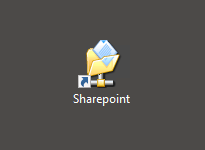
**Schritt 1:** Auf dem Desktop befindet sich ein neues Symbol auf dem Desktop mit der Bezeichnung "Sharepoint" - bitte öffnen Sie die Adresse durch einen Doppelklick
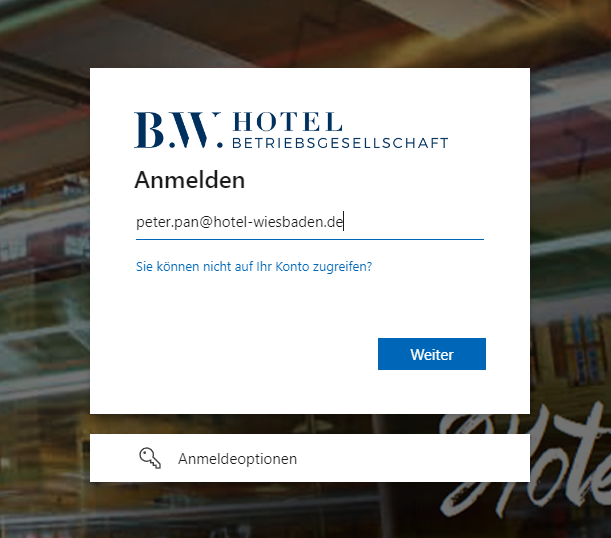
**Schritt 2:** Es erscheint nun eine Anmeldeseite, tragen Sie dort bitte Ihren Anmeldelogin ein (z.B. ) und klicken Sie auf Weiter.1
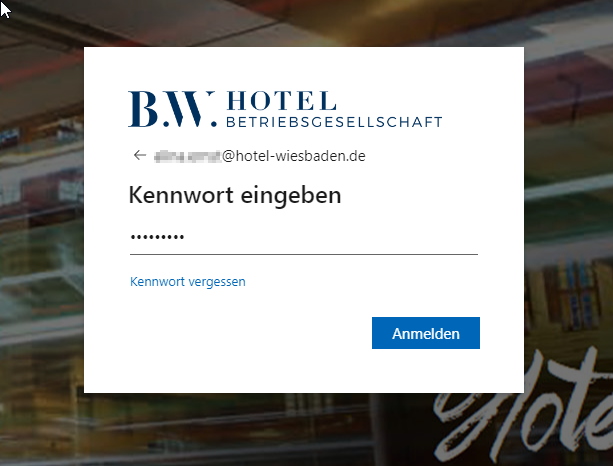
Geben Sie danach bitte Ihr Windows Anmeldepasswort ein und klicken auf ** Anmelden **.
**Schritt 3:**
Sichern Sie Ihr Konto mittels einer Zwei-Faktor-Authentifizierung - dafür benötigen Sie Ihr Smartphone!
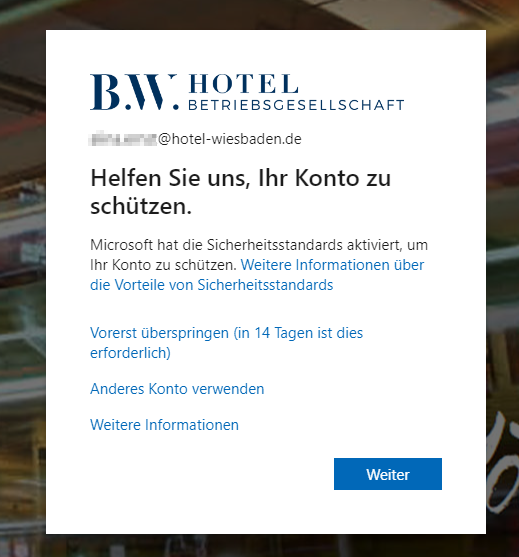
Klicken Sie zunächst auf Weiter - es erscheint folgende Seite :
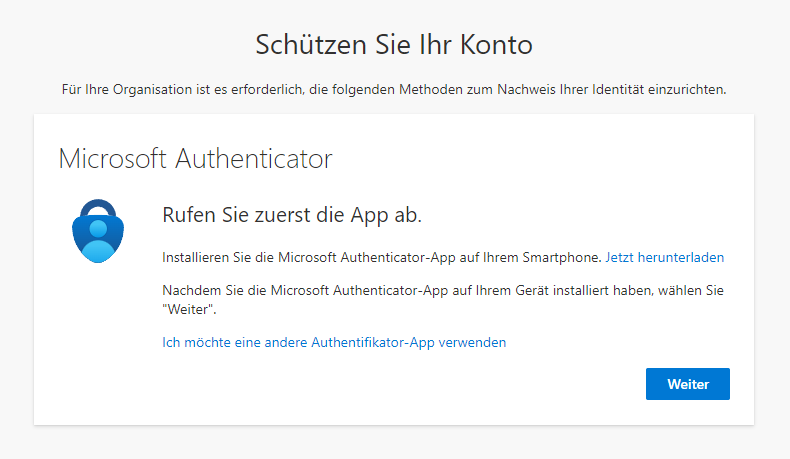
**Schritt 4:**
## Holen Sie sich die App auf Ihr Smartphone
Scannen Sie den QR-Code mit Ihrem Android- oder iOS-Mobilgerät.
[](https://docs.jager-its.de/uploads/images/gallery/2023-02/WuPimage.png)
Google Play Store
[](https://docs.jager-its.de/uploads/images/gallery/2023-02/pWfimage.png)
Apple App Store
Installieren Sie die App auf Ihrem Smartphone und erteilen Sie die geforderten Berechtigungen.
Die App sollte nun ungefähr so aussehen:
### **WICHTIG**: Bitte klicken Sie nicht auf [](https://docs.jager-its.de/uploads/images/gallery/2023-02/P1iimage.png)
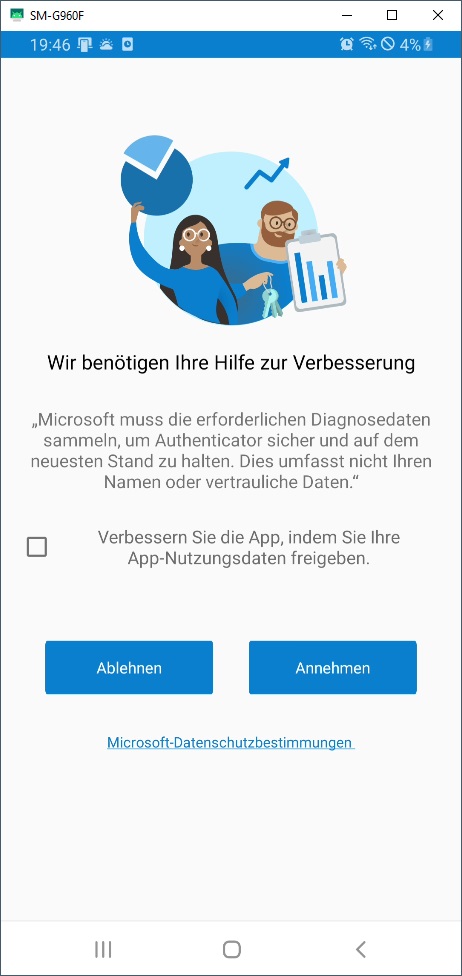 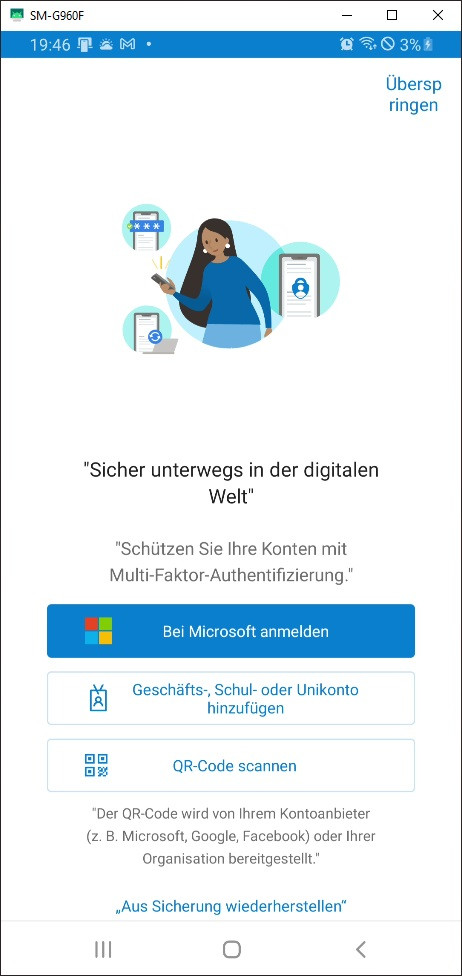
Sobald Sie die App geöffnet haben kehren Sie bitte wieder zum PC Bildschirm zurück und klicken im Fenster "Schützen Sie Ihr Konto" auf **Weiter** .
**Schritt 5:**
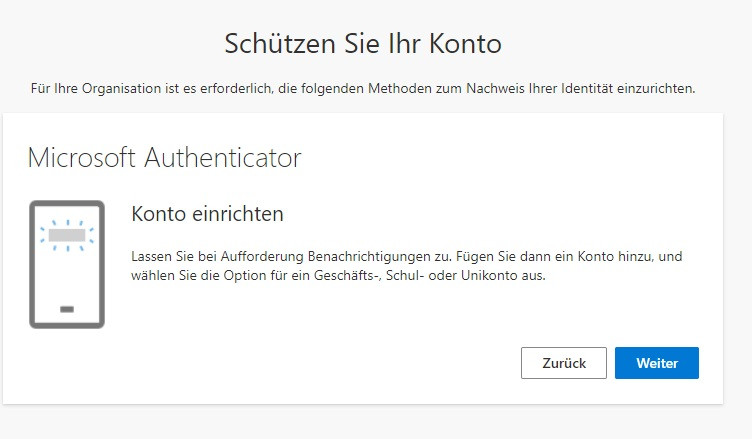
Klicken Sie hier bitte einfach auf **Weiter** .
Klicken Sie in der Smartphone-App nun auf "QR-Code scannen"
[](https://docs.jager-its.de/uploads/images/gallery/2023-02/v5oimage.png)
Scann Sie jetzt den QR-Code auf dem Bildschirm mit Ihrem Smartphone ab.
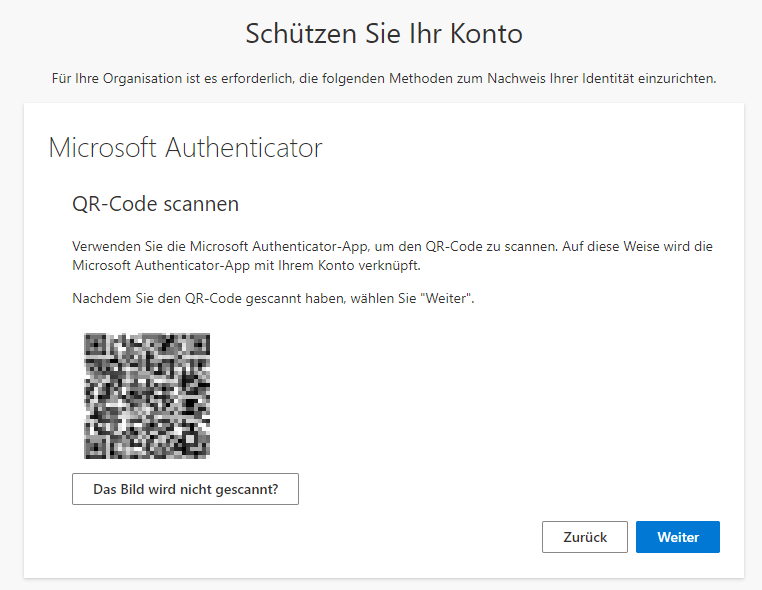
Wenn alles geklappt hat, sehen Sie in der Smartphone App Ihr Konto, ungefähr so:
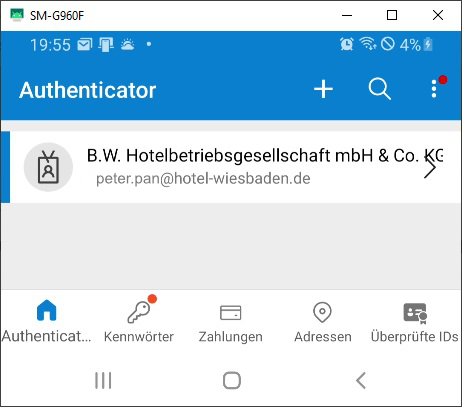
Klicken Sie auf dem Bildschirm bitte auf **Weiter** - Sie erhalten dann auf dem Smartphone eine Benachrichtigung, die Sie genehmigen müssen.
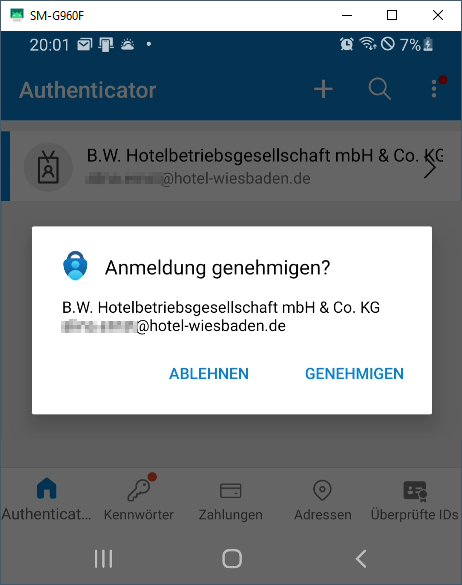
Nachdem Sie die Anmeldung genehmigt haben, erscheint auf dem Bildschirm folgender Hinweis :
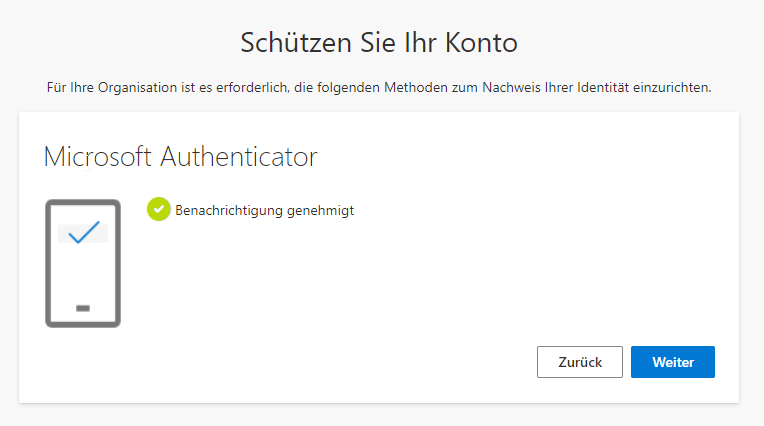
Klicken Sie hier bitte einfach auf **Weiter.**
[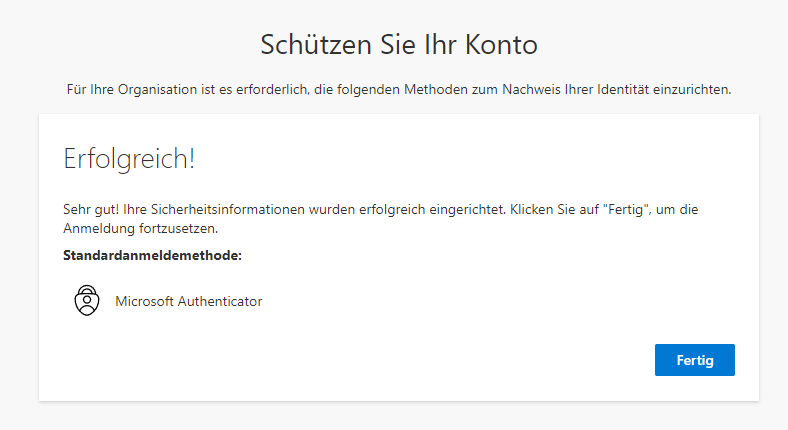](https://docs.jager-its.de/uploads/images/gallery/2023-02/XzWimage.png)
Klicken Sie hier bitte auf **Fertig
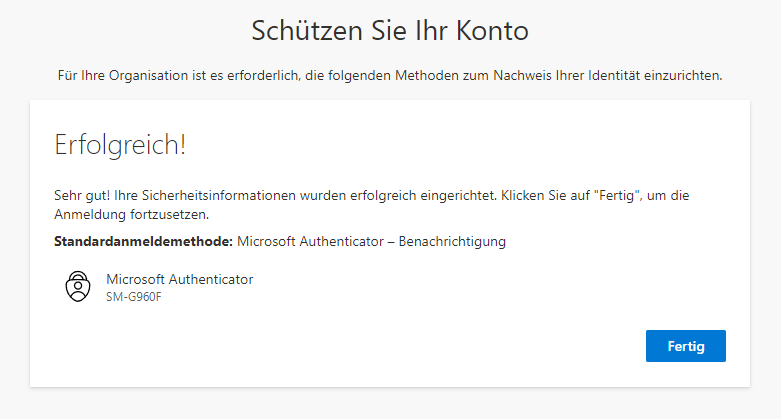
Klicken hier bitte ebenfalls auf **Fertig
Danach sind Sie eingeloggt - Sie werden bei jedem Login eine Benachrichtigung auf Ihrem Smartphone erhalten, die Sie genehmigen müssen um sich einzuloggen. Dies verhindert, dass unbefugte Personen, die evtl. Ihre Kombination aus Login und Passwort erraten oder gestohlen haben, Zugriff auf die Unternehmensdaten bekommen.
**Sollten Sie eine Benachrichtigung auf Ihrem Smartphone erhalten, obwohl Sie sich gerade nicht selbst einloggen, lehnen Sie die Aufforderung ab!**
Wenn Sie nach der Anmeldung folgenden Hinweis erhalten, so rufen Sie mich bitte an!
[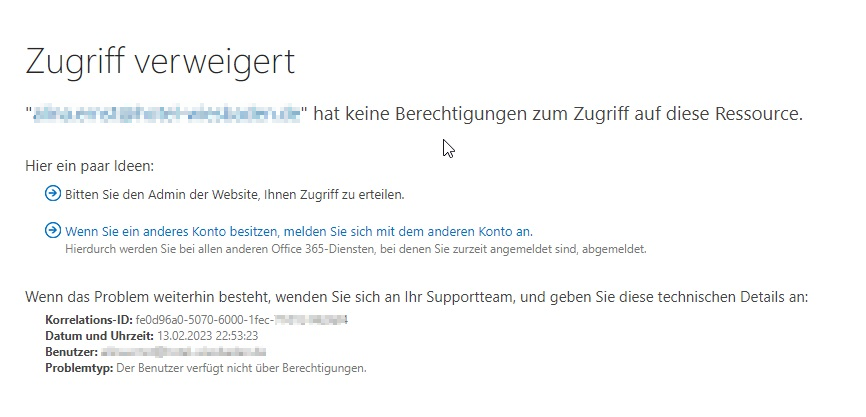](https://docs.jager-its.de/uploads/images/gallery/2023-02/j2fimage.png)
Hier finden Sie ein aufgezeichnetes Video, dass Ihnen den Umgang mit Sharepoint näher bringt:
[https://bwkghotel.sharepoint.com/SitePages/Aufzeichnung-der-Sharepoint-Schulung-ist-hochgeladen.aspx](https://bwkghotel.sharepoint.com/SitePages/Aufzeichnung-der-Sharepoint-Schulung-ist-hochgeladen.aspx)
# Welche DNS-Einträge muss ich für die Nutzung von Microsoft 365 vornehmen?
In diesem Artikel erfahren Sie, welche DNS-Einträge für Microsoft 365 benötigt werden und welchem Zweck diese dienen.
#### **DNS-Einträge für die Nutzung von Microsoft 365**
Damit Sie nach der Verifikation Ihrer Domain Microsoft 365 in vollem Umfang nutzen können, müssen folgende DNS-Einträge vorgenommen werden:
#### **Exchange Online**
Exchange Online ist in den Paketen Microsoft 365 Business Basic und Business Standard verfügbar.
**TYP**
**PRIORITÄT**
**PRÄFIX**
**HOSTNAME/IP**
**TTL**
MX
50
nureinbeispiel-de
mail.protection.outlook.com
1 Stunde
CNAME Einträge:
**TYP**
**PRIORITÄT**
**HOSTNAME**
**ZEIGT AUF**
**TTL**
CNAME
-
autodiscover
autodiscover.outlook.com
1 Stunde
Der MX-Eintrag sorgt dafür, dass E-Mails an Ihre Domain an die Microsoft 365-Server zugestellt werden.
Der CNAME-Eintrag stellt die Autokonfiguration für die Einrichtung von Outlook bereit.
**Hinweis:**
Bitte beachten Sie, dass wir beim Beispiel des MX-Record einen Platzhalter verwendet haben. Dieser muss bei bei der Einrichtung durch den für Sie individuell von Microsoft bereitgestellten MX-Record ersetzt werden! Bitte beachten Sie ebenfalls, dass nach der Umstellung auf den MX-Eintrag von Microsoft 365 die im KIS angelegten IMAP-Konten keine E-Mails mehr empfangen können!
**TYP**
**TXT-NAME**
**TXT-WERT**
**TTL**
TXT
@
v=spf1 include:spf.protection.outlook.com -all
1 Stunde
Der [SPF-Eintrag](https://faq.hosteurope.de/index.php?cpid=1154) ist optional, jedoch empfehlen wir dringend, diesen zu setzen, da dieser bei der Identifikation von Spam helfen kann.
#### **Skype for Business**
Skype for Business in ist in allen Microsoft 365 Tarifen verfügbar
**TYP**
**DIENST**
**PROTOKOLL**
**PORT**
**GEWICHTUNG**
**PRIORITÄT**
**NAME**
**ZIEL**
SRV
\_sip
\_tls
443
1
100
@
sipdir.online.lync.com
SRV
\_sipfederationtls
\_tcp
5061
1
100
@
sipfed.online.lync.com
CNAME Einträge:
**TYP**
**HOSTNAME**
**ZEIGT AUF**
**TTL**
CNAME
sip
sipdir.online.lync.com
1 Stunde
CNAME
lyncdiscover
webdir.online.lync.com
1 Stunde
####
#### **Mobile Device Management for Microsoft 365**
Mit dem Microsoft 365 Mobile Device Management können Sie Smartphones und Tablets für Ihre Mitarbeiter verwalten. Das Device Management ist standardmäßig nicht aktiv, sodass diese Einträge nur benötigt werden, wenn Sie diese Funktion nutzen möchten.
**TYP**
**HOSTNAME**
**ZEIGT AUF**
**TTL**
CNAME
enterpriseregistration
enterpriseregistration.windows.net
1 Stunde
CNAME
enterpriseenrollment
enterpriseenrollment.manage.microsoft.com
1 Stunde
#### **Zusätzliche Microsoft 365 Einträge**
Dieser Eintrag wird für die lokalen Office Anwendungen, wie z.B. Skype for Business Online oder Outlook zur Authentifizierung benötigt.
**TYP**
**HOSTNAME**
**ZEIGT AUF**
**TTL**
CNAME
msoid
clientconfig.microsoftonline-p.net
1 Stunde
# How to Use ‘fsck’ to Repair Linux File System Errors
[Linux Filesystems](https://www.tecmint.com/linux-directory-structure-and-important-files-paths-explained/ "Linux Filesystem Structure") are responsible for organizing how data is stored and recovered. One way or another, with time, the filesystem may become corrupted and certain parts of it may not be accessible. If your filesystem develops such inconsistency it is recommended to verify its integrity.
This can be completed via a system utility called **fsck** (**file system consistency check**), which checks the root file system automatically during boot time or ran manually.
In this article, we are going to review the **fsck command** and its usage to help you repair Linux disk errors.
Table of Contents
[ ]
### When to Use fsck Command in Linux
There are different scenarios when you will want to run **fsck**. Here are a few examples:
- The system fails to boot.
- Files on the system become corrupt (often you may see input/output error).
- The attached drive (including flash drives/SD cards) is not working as expected.
#### fsck Command Options
The **fsck command** needs to be run with superuser privileges or **root**. You can use it with different arguments. Their usage depends on your specific case. Below you will see some of the more important options:
- `-A` – Used for checking all filesystems. The list is taken from `/etc/fstab`.
- `-C` – Show progress bar.
- `-l` – Locks the device to guarantee no other program will try to use the partition during the check.
- `-M` – Do not check mounted filesystems.
- `-N` – Only show what would be done – no actual changes are made.
- `-P` – If you want to check filesystems in parallel, including root.
- `-R` – Do not check the root filesystem. This is useful only with ‘`-A`‘.
- `-r` – Provide statistics for each device that is being checked.
- `-T` – Does not show the title.
- `-t` – Exclusively specify the [Linux filesystem types](https://www.tecmint.com/find-file-types-in-linux/ "Find Out File Types in Linux") to be checked. Types can be comma-separated lists.
- `-V` – Provide a description of what is being done.
### Run fsck Command to Repair Linux File System Errors
In order to run **fsck**, you will need to ensure that the partition you are going to check is not mounted. For the purpose of this article, I will use my second drive `/dev/sdb` mounted in `/mnt`.
Here is what happens if I try to run **fsck** when the partition is mounted.
```
# fsck /dev/sdb
```
[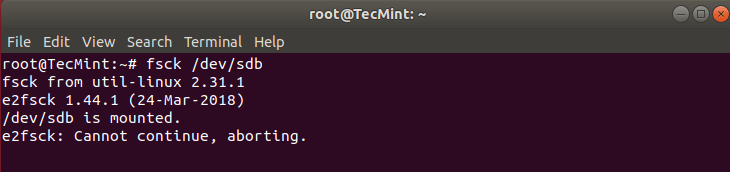](https://www.tecmint.com/wp-content/uploads/2018/09/Run-fsck-on-Mounted-Partition.png)Run fsck on Mounted PartitionTo avoid this unmount the partition using.
```
# umount /dev/sdb
```
Then **fsck** can be safely run with.
```
# fsck /dev/sdb
```
[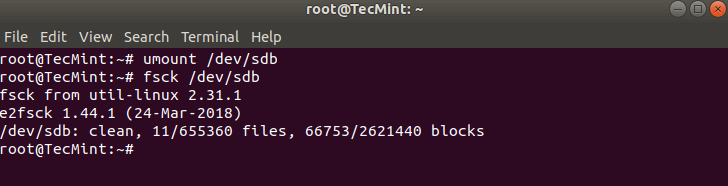](https://www.tecmint.com/wp-content/uploads/2018/09/Run-fsck-on-Linux-Partition.png)Run fsck on Linux Partition#### Understanding fsck Exit Codes
After running **fsck**, it will return an exit code. These codes can be seen in fsck’s manual by running:
```
# man fsck
0 No errors
1 Filesystem errors corrected
2 System should be rebooted
4 Filesystem errors were left uncorrected
8 Operational error
16 Usage or syntax error
32 Checking canceled by user request
128 Shared-library error
```
#### Fsck Repair Linux Filesystem
Sometimes more than one error can be found on a filesystem. In such cases, you may want **fsck** to automatically attempt to correct the errors. This can be done with:
```
# fsck -y /dev/sdb
```
The `-y` flag, automatically `“yes”` to any prompts from fsck to correct an error.
Similarly, you can run the same on all filesystems (without **root**):
```
$ fsck -AR -y
```
### How to Run fsck on Linux Root Partition
In some cases, you may need to run **fsck** on the **root** partition of your system. Since you cannot run **fsck** while the partition is mounted, you can try one of these options:
- Force fsck upon system boot
- Run fsck in rescue mode
We will review both situations.
#### Force fsck Upon System Boot
This is relatively easy to complete, the only thing you need to do is create a file called **forcefsck** in the root partition of your system. Use the following command:
```
# touch /forcefsck
```
Then you can simply force or schedule a [reboot of your system](https://www.tecmint.com/disable-shutdown-and-reboot-commands-in-linux/ "Reboot Commands in Linux"). During the next bootup, the **fsck** will be performed. If downtime is critical, it is recommended to plan this carefully, since if there are many used inodes on your system, **fsck** may take some extra time.
After your system boots, check if the file still exists:
```
# ls /forcefsck
```
If it does, you may want to remove it in order to avoid **fsck** on every system boot.
#### Run fsck in Rescue Mode
Running **fsck** in **rescue mode** requires a few more steps. First, prepare your system for **reboot**. Stop any critical services like **MySQL/MariaDB** etc and then type.
```
# reboot
```
During the boot, hold down the `shift` key so that the grub menu is shown. Select “**Advanced options**”.
[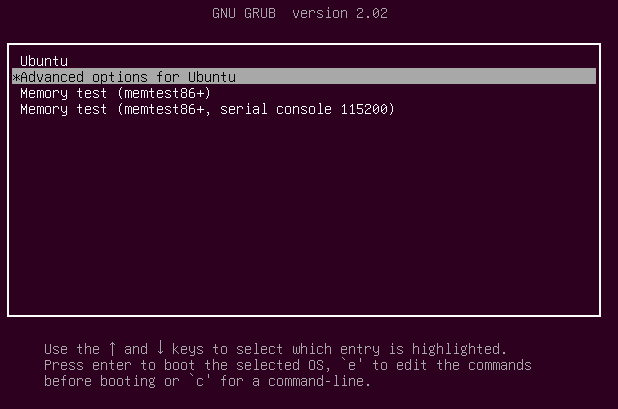](https://www.tecmint.com/wp-content/uploads/2018/09/Grub-Advance-Options.png)Grub Advanced OptionsThen choose “**Recovery mode**”.
[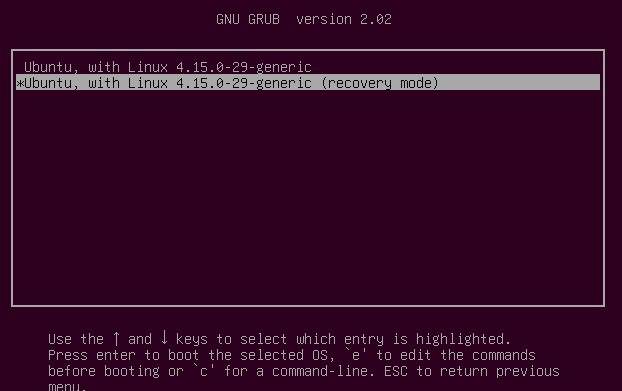](https://www.tecmint.com/wp-content/uploads/2018/09/Select-Linux-Recovery-Mode.png)Select Linux Recovery ModeIn the next menu select “**fsck**”.
[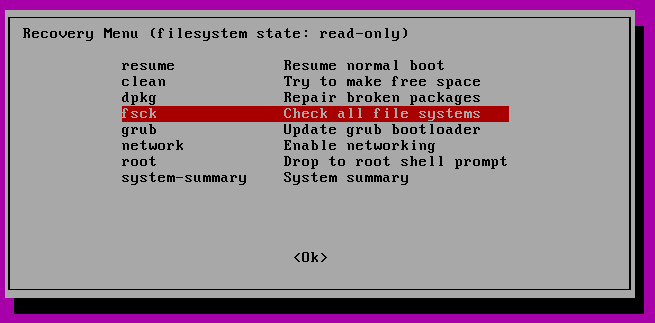](https://www.tecmint.com/wp-content/uploads/2018/09/Select-fsck-Utility.png)Select fsck UtilityYou will be asked if you wish to have your `/` filesystem remounted. Select `“yes”`.
[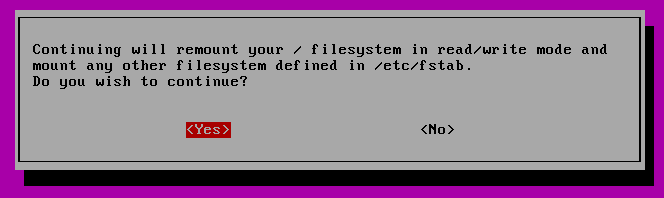](https://www.tecmint.com/wp-content/uploads/2018/09/Confirm-Root-Filesystem.png)Confirm Root FilesystemYou should see something similar to this.
[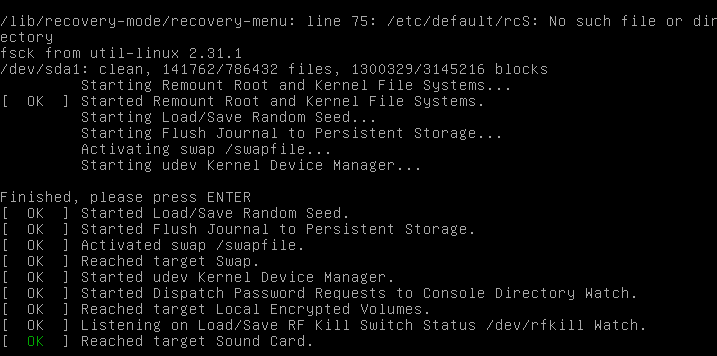](https://www.tecmint.com/wp-content/uploads/2018/09/Running-fsck-Filesystem-Check.png)Running fsck Filesystem CheckYou can then resume normal boot, by selecting **“Resume”**.
[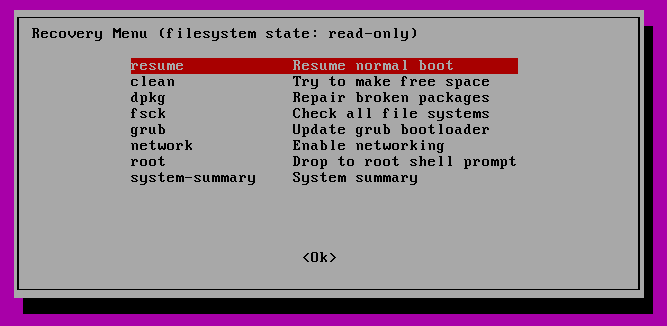](https://www.tecmint.com/wp-content/uploads/2018/09/Select-Normal-Boot.png)Select Normal Boot##### Conclusion
In this tutorial, you learned how to use fsck and run consistency checks on different Linux filesystems. If you have any questions about **fsck**, please do not hesitate to submit them in the comment section below.
# Microsoft 365 SMTP Adressen
# Anmeldung bei Sharepoint mit Sicherheitsschlüssel
Rufen Sie die Sharepoint Seite über den Link auf dem Desktop auf.
[](https://docs.jager-its.de/uploads/images/gallery/2023-07/R7Mimage.png)
#### Abmeldung von anderen Sharepoint-Nutzern
- Sollte noch ein anderer Benutzer angemeldet sein, so melden Sie sich bitte ab. Klicken Sie dazu zuerst oben rechts in der Ecke auf den Kreis mit den Initialen Ihres Namens (Hier ist bereits der Nighty angemeldet) udn dann auf "Abmelden" darunter.
[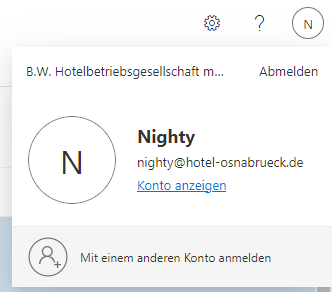](https://docs.jager-its.de/uploads/images/gallery/2023-07/uXQimage.png)[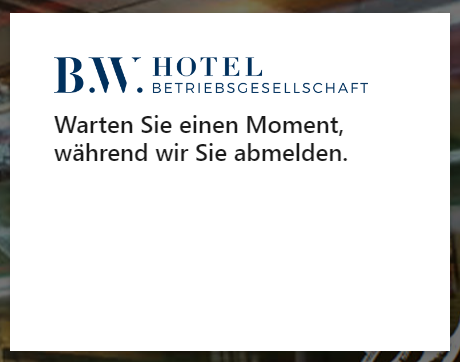](https://docs.jager-its.de/uploads/images/gallery/2023-07/geQimage.png)
- Ggf. müssen Sie noch das Konto auswählen, welches Sie abmelden wollen - wählen Sie hier das Selbe Konto aus. Wenn alles geklappt hat, sehen Sie folgenden Bildschirm.
[](https://docs.jager-its.de/uploads/images/gallery/2023-07/Gklimage.png)
- Schließen Sie sicherheitshalber den Brower-Tab und öffnen Sie Sharepoint erneut mit Klick auf das Symbol auf dem Desktop.
#### Anmelden bei Sharepoint
- Nachdem Sie das Symbol auf dem Desktop angeklickt haben, sollte dieses Fenster erscheinen. Klicken Sie bitte auf "**Anmeldeoptionen**"
[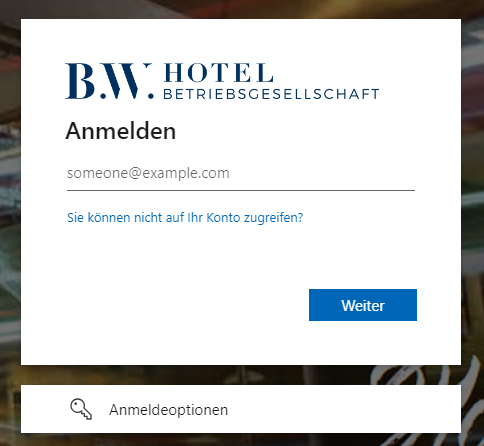](https://docs.jager-its.de/uploads/images/gallery/2023-07/image.png)
- Wählen Sie im nächsten Dialogfeld "Mit Windows Hello oder einem Sicherheitsschlüssel anmelden" aus
[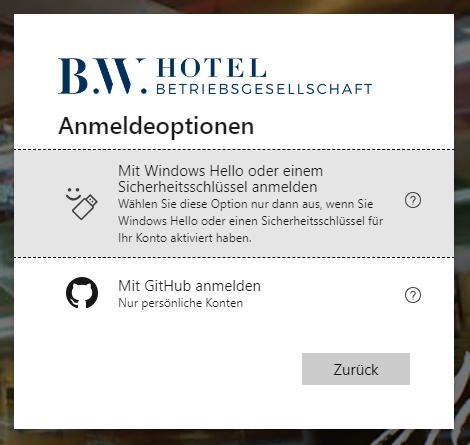](https://docs.jager-its.de/uploads/images/gallery/2023-07/oKkimage.png)
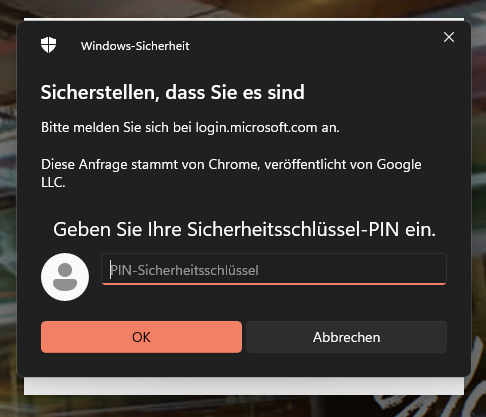
- Anschließend werden Sie aufgefordert, den USB-Stick anzuschließen - stecken Sie die USB-Stick (vorsichtig und mit Gefühl) in einen freien USB-Anschluss. Sobald der Stick bereit ist, werden Sie aufgefordert die festgelegt PIN einzugeben.
[](https://docs.jager-its.de/uploads/images/gallery/2023-07/8bYimage.png)
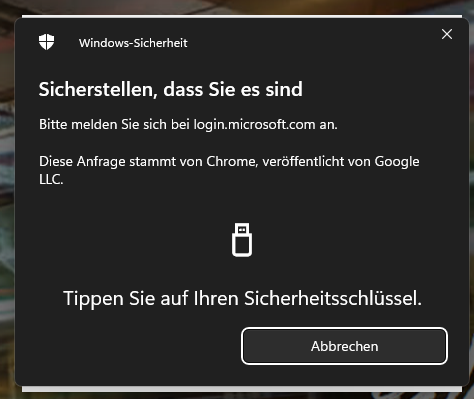
- Nachdem Sie PIN eingegeben haben, erscheint der folgende Dialog. Der USB-Stick hat auf der Rückseite ein kleines Stück Metall, berühren Sie den Stick an dieser Stelle mit einem Finger.
[](https://docs.jager-its.de/uploads/images/gallery/2023-07/Y8aimage.png)
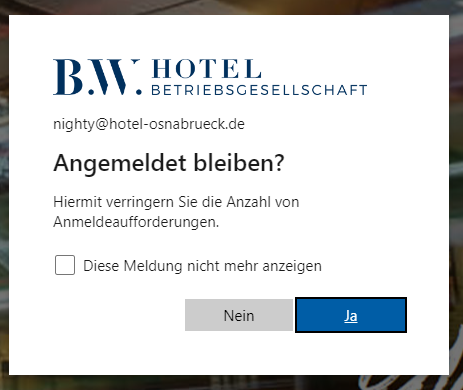
- Im folgenden Dialog, können Sie entweder JA oder NEIN auswählen, dies spielt für die weitere Anmeldung keinerlei Rolle. Diese Frage lässt sich allerdings nicht ausblenden und kommt daher jedes Mal.
[](https://docs.jager-its.de/uploads/images/gallery/2023-07/ZFnimage.png)
# Chromium Update unter Ubuntu 20.04 (arm64) auf RK3688
Zunächst den installierten Chromium Browser deinstallieren mit
```bash
sudo apt remove chromium-browser
```
Danach Paketquellen aktualisieren und updaten:
```bash
sudo apt update && sudo apt upgrade -y
```
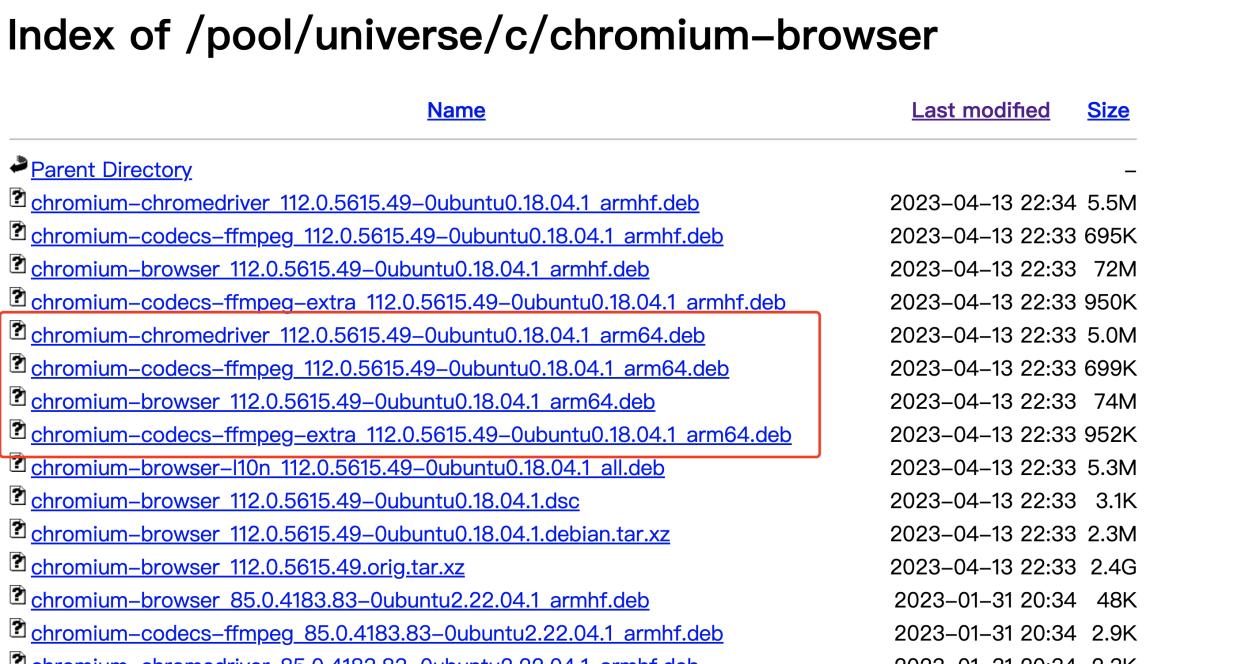
Download der neuen Chromium Version als .deb Files unter :
[http://ports.ubuntu.com/pool/universe/c/chromium-browser/?C=M;O=D](http://ports.ubuntu.com/pool/universe/c/chromium-browser/?C=M;O=D)
[](https://docs.jager-its.de/uploads/images/gallery/2023-10/heiimage.png)
Die Version für Ubuntu 18.04 läuft auch unter 20.04 - diese Dateien herunterladen mit :
```bash
cd Downloads
wget http://ports.ubuntu.com/pool/universe/c/chromium-browser/chromium-chromedriver_112.0.5615.49-0ubuntu0.18.04.1_arm64.deb
wget http://ports.ubuntu.com/pool/universe/c/chromium-browser/chromium-codecs-ffmpeg_112.0.5615.49-0ubuntu0.18.04.1_arm64.deb
wget http://ports.ubuntu.com/pool/universe/c/chromium-browser/chromium-browser_112.0.5615.49-0ubuntu0.18.04.1_arm64.deb
wget http://ports.ubuntu.com/pool/universe/c/chromium-browser/chromium-codecs-ffmpeg-extra_112.0.5615.49-0ubuntu0.18.04.1_arm64.deb
```
und danach mit `sudo dpkg -i chromium*` installieren.
Anzeigen der installierten Chromium Version mit :
```bash
chromedriver -v
chromium-browser -version
```
[](https://docs.jager-its.de/uploads/images/gallery/2023-10/image.png)
# Freigabe eines Exchange-Kalenders
Die Freigabe eines Exchange-Kalenders können Sie im Microsoft Outlook durchführen, wenn Outlook für Exchange eingerichtet wurde. Um einen Exchange Kalender freizugeben, wechseln Sie als erstes zur Kalender- oder Ordneransicht, diese finden Sie in den Schalflächen links unten.
#### Einen neuen Kalender erstellen
Optional können Sie für verschiedene Zwecke je einen neuen Kalender erstellen. Klicken Sie mit einem Rechtsklick auf den primären Kalender. Erstellen Sie einen neuen Kalender über die Option **Neuer Kalender…**.[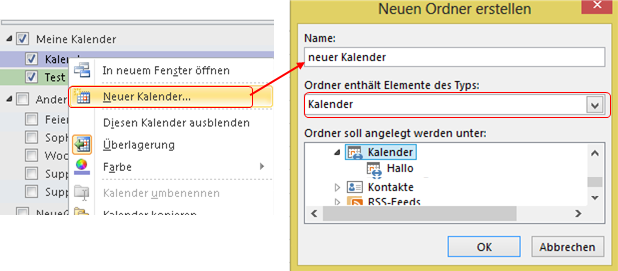](https://docs.gwdg.de/lib/exe/detail.php?id=de%3Aservices%3Aemail_collaboration%3Aemail_service%3A1windows%3Aoutlook_config%3Acalendar&media=de:services:email_collaboration:email_service:1windows:outlook2010_neuerkalender.png "de:services:email_collaboration:email_service:1windows:outlook2010_neuerkalender.png")
#### Freigabe per E-Mail versenden
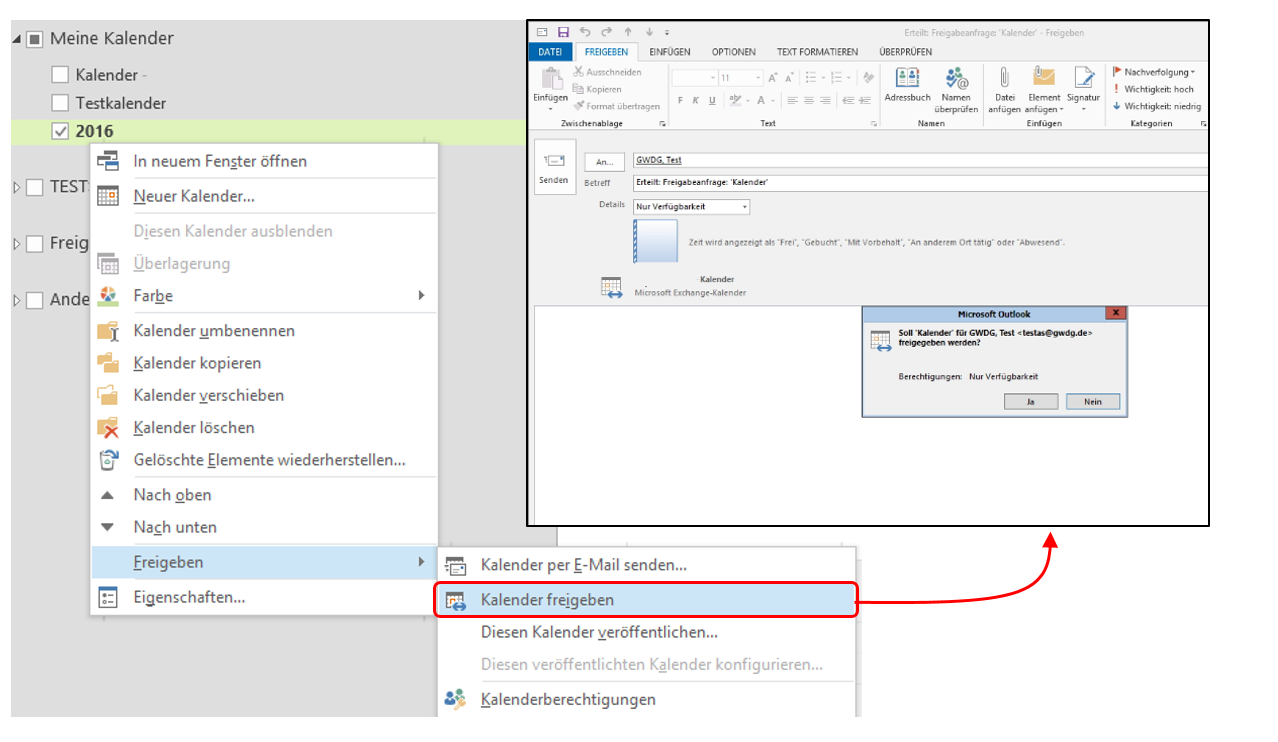
Jeder neue Kalender muss für sich freigegeben werden. Dieses können Sie tun, indem Sie mit der rechten Maustaste auf dem Kalender klicken und die **Freigeben** Option wählen.
[](https://docs.jager-its.de/uploads/images/gallery/2025-07/image.png)
Zur Information des Empfängers können Sie in das große weiße Feld einen beliebigen Text eingeben. Sobald die Freigabe gesendet ist, erhält der eine E-Mail.
#### Freigabeberechtigungen anpassen
Mit der rechten Maustaste klicken Sie auf den neuen Kalender und rufen die Option **Eigenschaften…** auf.
[](https://docs.gwdg.de/lib/exe/detail.php?id=de%3Aservices%3Aemail_collaboration%3Aemail_service%3A1windows%3Aoutlook_config%3Acalendar&media=de:services:email_collaboration:email_service:1windows:outlook_config:outlook2010_eigenschaften_berechtigungen.png "de:services:email_collaboration:email_service:1windows:outlook_config:outlook2010_eigenschaften_berechtigungen.png")
1\. Unter der Registerkarte **Berechtigungen** klicken Sie auf die Schaltfläche **Hinzufügen** und wählen einen(mehreren) Benutzer(n) aus dem **Globalen Adressbuch** aus. In seltenen Fällen kann es vorkommen, dass Sie den gewünschten Benutzer nicht finden können, z.B. wenn er keinen Eintrag im **Globalen Adressbuch** wünscht. In einem solchen Fall kontaktieren bitte unseren Support.
2\. Stellen Sie Berechtigungsstufe manuell ein oder wählen Sie die über das Dropdownmenü aus. Die Einstellung ermöglicht es dem in Punkt 1. ausgewählten Anwendern z.B. Änderungen in dem freigegebenen Kalender vorzunehmen.
#### Freigegebenen Kalender öffnen
Beim Hinzufügen bzw. Öffnen eines freigegebenen Kalenders unterscheidet man zwischen dem Standardkalender (1) und einem neuen Kalender (2):
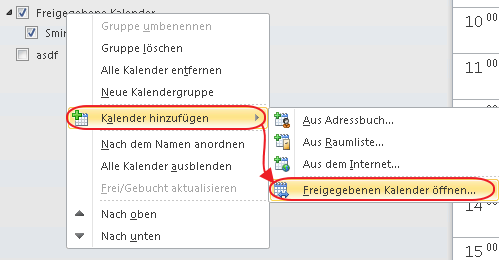
1\. Das Öffnen des Standardkalenders erfolgt im Outlook mit einem Rechtsklick auf dem vorhandenen Kalender, dazu reicht es den Namen des Benutzers zu kennen:
[](https://docs.gwdg.de/lib/exe/detail.php?id=de%3Aservices%3Aemail_collaboration%3Aemail_service%3A1windows%3Aoutlook_config%3Acalendar&media=de:services:email_collaboration:email_service:1windows:outlook_config:outlook2010_kalender_oeffnen1.png "de:services:email_collaboration:email_service:1windows:outlook_config:outlook2010_kalender_oeffnen1.png")
Den Namen der Person, dessen Kalender Sie einbinden wollen, müssen Sie aus dem **Globalen Adressbuch** heraussuchen. Grundsätzlich muss für solche Aktion die [primäre E-Mail Adresse ](https://docs.gwdg.de/doku.php?id=de:services:email_collaboration:email_service:5primaryemail "de:services:email_collaboration:email_service:5primaryemail")verwendet werden.
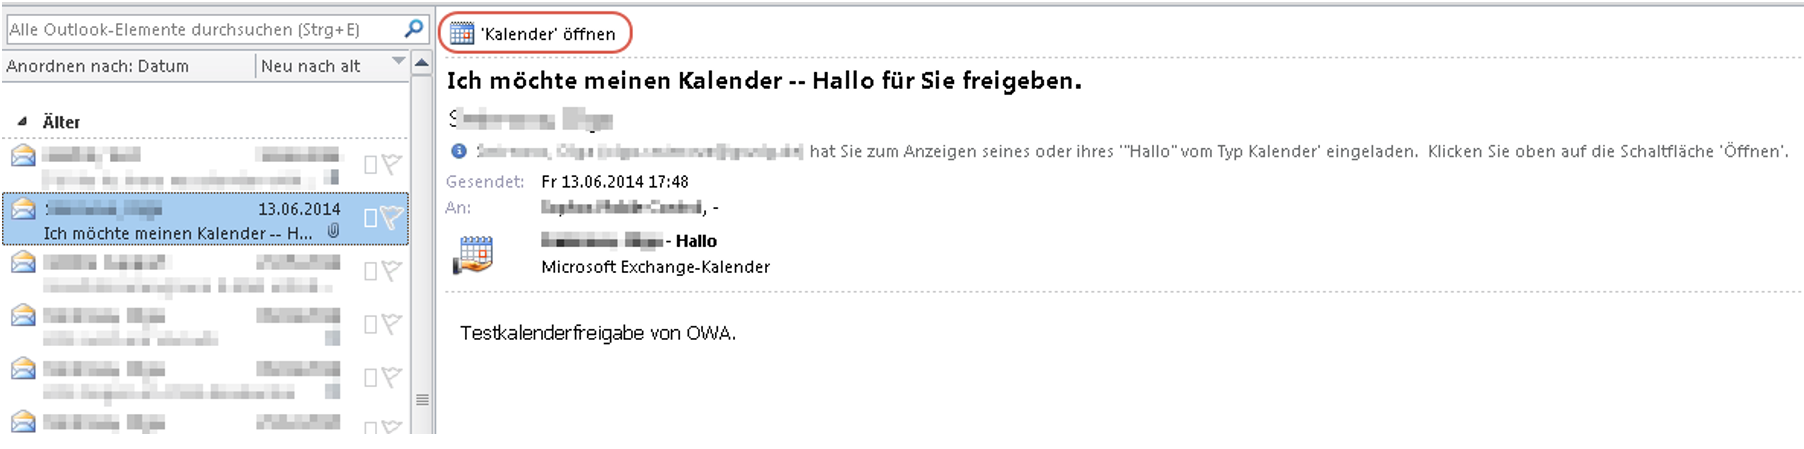
2\. Wenn es sich um einen neuen Kalender handelt, sollte das Hinzufügen per E-Mail-Benachrichtigung erfolgen. Bei einer Freigabe-E-Mail reicht es aus auf die Schalfläche **Kalender öffnen** zu klicken um den Kalender im Outlook hinzuzufügen:
[](https://docs.gwdg.de/lib/exe/detail.php?id=de%3Aservices%3Aemail_collaboration%3Aemail_service%3A1windows%3Aoutlook_config%3Acalendar&media=de:services:email_collaboration:email_service:1windows:outlook_config:outlook2010_kalender_oeffnen.png "de:services:email_collaboration:email_service:1windows:outlook_config:outlook2010_kalender_oeffnen.png")
# Proxmox Konfiguration sichern / wiederherstellen
#### 💾 **Proxmox VE Konfiguration sichern**
- Das Backup wird als `.tar.gz` auf ein **NAS-Verzeichnis** speichert (per gemountetem Netzlaufwerk oder NFS/SMB).
- **Automatisch nur die letzten 7 Tage** werden aufbewahrt (ältere Backups werden gelöscht).
##### ✅ **1. Voraussetzungen**
- Dein NAS ist **bereits als Verzeichnis gemountet** auf z. B. `/mnt/nas-backup`
- Das Verzeichnis `/mnt/nas-backup/proxmox-config` existiert oder wird vom Skript erstellt.
##### 🧾 **2. Backup-Skript: `/root/proxmox_config_backup.sh`**
```bash
#!/bin/bash
# === Konfiguration ===
BACKUP_DIR="/mnt/nas-backup/proxmox-config"
DATE=$(date +%F)
ARCHIVE_NAME="proxmox-config-$DATE.tar.gz"
TMP_DIR="/tmp/proxmox-config-backup"
# === Vorbereitungen ===
mkdir -p "$TMP_DIR"
mkdir -p "$BACKUP_DIR"
# === Dateien kopieren ===
cp -a /etc/pve "$TMP_DIR"
cp -a /etc/network/interfaces "$TMP_DIR"
cp -a /etc/hosts "$TMP_DIR"
cp -a /etc/resolv.conf "$TMP_DIR"
cp -a /etc/fstab "$TMP_DIR"
cp -a /root "$TMP_DIR"
# === Archiv erstellen ===
tar -czf "$BACKUP_DIR/$ARCHIVE_NAME" -C "$TMP_DIR" .
# === Temporäre Dateien entfernen ===
rm -rf "$TMP_DIR"
# === Alte Backups löschen (älter als 7 Tage) ===
find "$BACKUP_DIR" -name "proxmox-config-*.tar.gz" -mtime +7 -exec rm {} \;
echo "✅ Proxmox-Konfiguration wurde gesichert nach: $BACKUP_DIR/$ARCHIVE_NAME"
```
##### 🕒 **3. Automatisierung mit `cron`**
1. **Skript ausführbar machen** ```bash
chmod +x /root/proxmox_config_backup.sh
```
2. ****Cronjob einrichten****```bash
crontab -e
```
→ Am Ende einfügen, um es täglich um 3:00 Uhr nachts auszuführen:
```
0 3 * * * /root/proxmox_config_backup.sh >> /var/log/proxmox-config-backup.log 2>&1
```
#### 🛠️ **Proxmox-Wiederherstellung aus Konfig-Backup**
##### 🔁 **1. Proxmox neu installieren**
Installiere die gleiche oder eine möglichst ähnliche Version von Proxmox VE auf der neuen Hardware.
➡️ [Proxmox VE Download](https://www.proxmox.com/de/downloads)
##### 🧾 **2. Wiederherstellungs-Skript: `/root/proxmox_config_restore.sh`**
```powershell
#!/bin/bash
# === ANPASSEN: Pfad zur Backup-Datei ===
BACKUP_ARCHIVE="/mnt/nas-backup/proxmox-config/proxmox-config-202x-xx-xx.tar.gz"
TMP_DIR="/tmp/proxmox-restore"
# === Vorbereitungen ===
echo "📦 Entpacke Backup..."
mkdir -p "$TMP_DIR"
tar -xzf "$BACKUP_ARCHIVE" -C "$TMP_DIR"
# === Proxmox-Dienste stoppen ===
echo "🛑 Stoppe Proxmox-Dienste..."
systemctl stop pve-cluster
systemctl stop corosync
systemctl stop pvedaemon
systemctl stop pveproxy
# === Konfiguration wiederherstellen ===
echo "🔁 Stelle Konfiguration wieder her..."
cp -a "$TMP_DIR/pve/." /etc/pve/
cp -a "$TMP_DIR/interfaces" /etc/network/interfaces
cp -a "$TMP_DIR/hosts" /etc/hosts
cp -a "$TMP_DIR/resolv.conf" /etc/resolv.conf
cp -a "$TMP_DIR/fstab" /etc/fstab
cp -a "$TMP_DIR/root/." /root/
# === Dienste starten ===
echo "✅ Starte Proxmox-Dienste neu..."
systemctl start pve-cluster
systemctl start corosync
systemctl start pvedaemon
systemctl start pveproxy
# === Aufräumen ===
rm -rf "$TMP_DIR"
echo "✅ Wiederherstellung abgeschlossen. Webinterface prüfen!"
```
(Es empfiehlt sich, dieses Skript ebenfalls schon vorher unter /root/ zu speichern, dann wird es gleich mit gesichert und steht bei einem Restore gleich zu Verfügung)
👉 **Nicht vergessen - Skript ausführbar machen:**
```bash
chmod +x /root/proxmox_restore_config.sh
```
**🧰 3. Gewünschtes Backup auswählen (Zeile 4 anpassen) und Skript ausführen**
```powershell
cd /
./proxmox_config_restore.sh
```
# Outlook (klassisch): Signaturen-Button friert ein / öffnet nicht
##### Symptom
- Beim Klick auf **Signaturen** (Datei → Optionen → E-Mail → Signaturen, oder im neuen Mail-Fenster) friert Outlook kurz ein.
- Danach passiert nichts, der Signaturen-Dialog erscheint nicht.
##### Umgebung
- Windows 11 Pro
- Microsoft 365 / Office 365 (Outlook klassisch)
##### Ursache
Auf dem System sind **vorinstallierte Microsoft Office Desktop Apps (UWP/MODA)** parallel zur eigentlichen Office-365-Installation vorhanden. Diese kollidieren mit dem Signatur-Dialog → Outlook hängt.
Typisch auf OEM-PCs oder Systemen, auf denen vorher eine andere Office-Version lag.
##### Lösung
1. PowerShell als Administrator öffnen
2. Vorinstallierte Office Desktop Apps für alle Benutzer entfernen
```powershell
Get-AppxProvisionedPackage -online | %{if ($_.packagename -match "Microsoft.Office.Desktop") {$_ | Remove-AppxProvisionedPackage -AllUsers}}
```
# Brother MFC-L8690CDW - Trommel ersetzen
Ihr Brother Gerät verwendet separate Verbrauchsmaterialien, die Tonerkassette und die Trommeleinheit. Vergewissern Sie sich, dass Sie nur die Trommeleinheit wechseln und nicht die Tonerkassette. Klicken Sie hier um den Unterschied zwischen der Trommeleinheit und der Tonerkassette zu sehen.
Sie benötigen die Trommeleinheit **DR-421CL**!
Ersetzen Sie die Trommel, indem Sie die unten stehenden Schritte befolgen:
1. Stellen Sie sicher, dass das Gerät **eingeschaltet** ist.
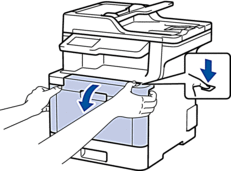
2. Drücken Sie die Entriegelungstaste der vorderen Abdeckung und öffnen Sie dann die Abdeckung.
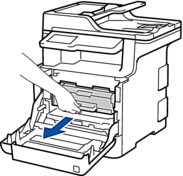
3. Halten Sie den grünen Griff der Trommeleinheit. Ziehen Sie die Trommeleinheit bis zum Anschlag raus.
4. Drehen Sie den grünen Hebel (1) gegen den Uhrzeigersinn, bis dieser einrastet. Heben Sie die Trommeleinheit an dem grünen Griff leicht an und ziehen die Trommel ganz aus dem Drucker.
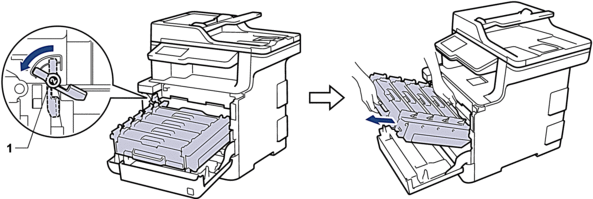Halten Sie die Trommeleinheit an den grünen Griffen, während Sie diese tragen. Halten Sie die Trommeleinheit NICHT an den Seiten.
5. Packen Sie die neue Trommeleinheit aus.
6. Entfernen Sie die Schutzabdeckung.
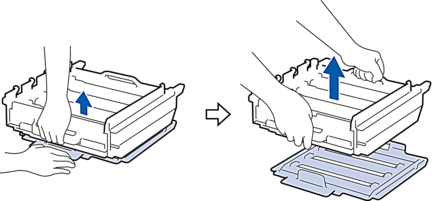
7. Halten Sie den Griff der Tonerkassette und schieben Sie es zum Entsperren vorsichtig von Ihnen weg. Ziehen Sie es aus der Trommel-Einheit. Wiederholen Sie dies für alle Tonerkassetten.
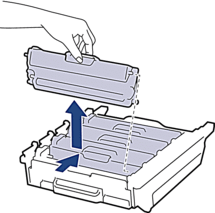
8. Drücken Sie die Tonerkassette zurück in die Trommeleinheit, bis Sie hörbar einrastet. Achten Sie bitte darauf, dass Sie die Tonerpatronenfarbe an die Stelle mit dem farbgleichen Aufkleber einsetzen. Wiederholen Sie dies für alle Tonerkassetten.
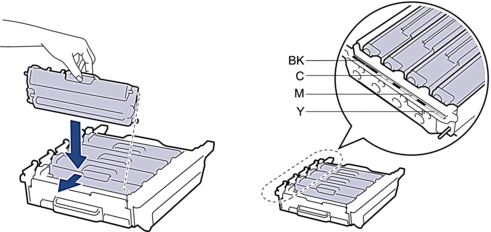Stellen Sie sicher, dass Sie die Tonerkassette korrekt einsetzen, da sie sich sonst von der Trommeleinheit lösen kann.
9. Vergewissern Sie sich, dass der grüne Sperrhebel (1) wie im Bild dargestellt in der richtigen Position zum Einsetzen der Trommel steht.
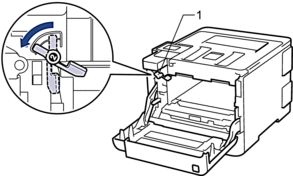
10. Setzen Sie die Trommeleinheit in der Maschine ein, bis es am grünen Sperrhebel stoppt.
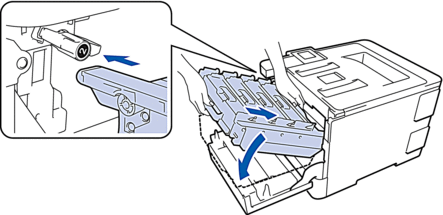
11. Drehen Sie den grünen Sperrhebel (1) in die Verriegelungsposition.

12. Schieben Sie die Trommeleinheit am grünen Griff zurück in die Maschine, bis diese einrastet.
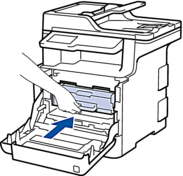
13. Schließen Sie die vordere Abdeckung.
### TrommelzählerzurücksetzenWenn Sie die Trommeleinheit gegen eine Neue getauscht haben, beachten Sie bitte, dass der Trommelzähler wie folgt zurückzusetzen ist:
1. Stellen Sie sicher, dass das Gerät **eingeschaltet** ist.
2. Drücken Sie auf (**Einstellungen**) > **Alle Einstellungen** > **Geräte Info**. > **Lebensdauer**Falls Ihr Gerät auf dem Home-Bildschirm **Alle Einstellungen** anzeigt, überspringen Sie das Menü **Einstellungen**.
3. Drücken und halten Sie **Trommel** oder **Trommellebensdauer** bis das Gerät die Anzeige ändert.
4. Drücken Sie **Ja**.
5. Drücken Sie  **Home**.