# How to Use ‘fsck’ to Repair Linux File System Errors
[Linux Filesystems](https://www.tecmint.com/linux-directory-structure-and-important-files-paths-explained/ "Linux Filesystem Structure") are responsible for organizing how data is stored and recovered. One way or another, with time, the filesystem may become corrupted and certain parts of it may not be accessible. If your filesystem develops such inconsistency it is recommended to verify its integrity.
This can be completed via a system utility called **fsck** (**file system consistency check**), which checks the root file system automatically during boot time or ran manually.
In this article, we are going to review the **fsck command** and its usage to help you repair Linux disk errors.
Table of Contents
[ ]
### When to Use fsck Command in Linux
There are different scenarios when you will want to run **fsck**. Here are a few examples:
- The system fails to boot.
- Files on the system become corrupt (often you may see input/output error).
- The attached drive (including flash drives/SD cards) is not working as expected.
#### fsck Command Options
The **fsck command** needs to be run with superuser privileges or **root**. You can use it with different arguments. Their usage depends on your specific case. Below you will see some of the more important options:
- `-A` – Used for checking all filesystems. The list is taken from `/etc/fstab`.
- `-C` – Show progress bar.
- `-l` – Locks the device to guarantee no other program will try to use the partition during the check.
- `-M` – Do not check mounted filesystems.
- `-N` – Only show what would be done – no actual changes are made.
- `-P` – If you want to check filesystems in parallel, including root.
- `-R` – Do not check the root filesystem. This is useful only with ‘`-A`‘.
- `-r` – Provide statistics for each device that is being checked.
- `-T` – Does not show the title.
- `-t` – Exclusively specify the [Linux filesystem types](https://www.tecmint.com/find-file-types-in-linux/ "Find Out File Types in Linux") to be checked. Types can be comma-separated lists.
- `-V` – Provide a description of what is being done.
### Run fsck Command to Repair Linux File System Errors
In order to run **fsck**, you will need to ensure that the partition you are going to check is not mounted. For the purpose of this article, I will use my second drive `/dev/sdb` mounted in `/mnt`.
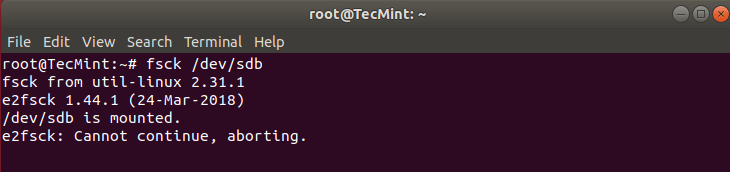
Here is what happens if I try to run **fsck** when the partition is mounted.
```
# fsck /dev/sdb
```
[](https://www.tecmint.com/wp-content/uploads/2018/09/Run-fsck-on-Mounted-Partition.png)Run fsck on Mounted PartitionTo avoid this unmount the partition using.
```
# umount /dev/sdb
```
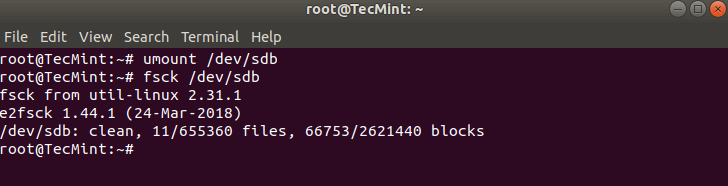
Then **fsck** can be safely run with.
```
# fsck /dev/sdb
```
[](https://www.tecmint.com/wp-content/uploads/2018/09/Run-fsck-on-Linux-Partition.png)Run fsck on Linux Partition#### Understanding fsck Exit Codes
After running **fsck**, it will return an exit code. These codes can be seen in fsck’s manual by running:
```
# man fsck
0 No errors
1 Filesystem errors corrected
2 System should be rebooted
4 Filesystem errors were left uncorrected
8 Operational error
16 Usage or syntax error
32 Checking canceled by user request
128 Shared-library error
```
#### Fsck Repair Linux Filesystem
Sometimes more than one error can be found on a filesystem. In such cases, you may want **fsck** to automatically attempt to correct the errors. This can be done with:
```
# fsck -y /dev/sdb
```
The `-y` flag, automatically `“yes”` to any prompts from fsck to correct an error.
Similarly, you can run the same on all filesystems (without **root**):
```
$ fsck -AR -y
```
### How to Run fsck on Linux Root Partition
In some cases, you may need to run **fsck** on the **root** partition of your system. Since you cannot run **fsck** while the partition is mounted, you can try one of these options:
- Force fsck upon system boot
- Run fsck in rescue mode
We will review both situations.
#### Force fsck Upon System Boot
This is relatively easy to complete, the only thing you need to do is create a file called **forcefsck** in the root partition of your system. Use the following command:
```
# touch /forcefsck
```
Then you can simply force or schedule a [reboot of your system](https://www.tecmint.com/disable-shutdown-and-reboot-commands-in-linux/ "Reboot Commands in Linux"). During the next bootup, the **fsck** will be performed. If downtime is critical, it is recommended to plan this carefully, since if there are many used inodes on your system, **fsck** may take some extra time.
After your system boots, check if the file still exists:
```
# ls /forcefsck
```
If it does, you may want to remove it in order to avoid **fsck** on every system boot.
#### Run fsck in Rescue Mode
Running **fsck** in **rescue mode** requires a few more steps. First, prepare your system for **reboot**. Stop any critical services like **MySQL/MariaDB** etc and then type.
```
# reboot
```
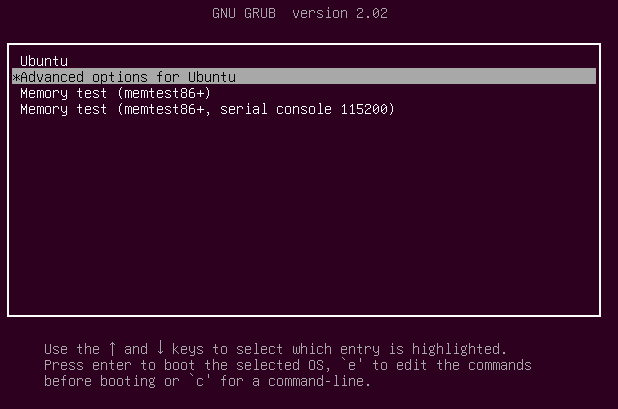
During the boot, hold down the `shift` key so that the grub menu is shown. Select “**Advanced options**”.
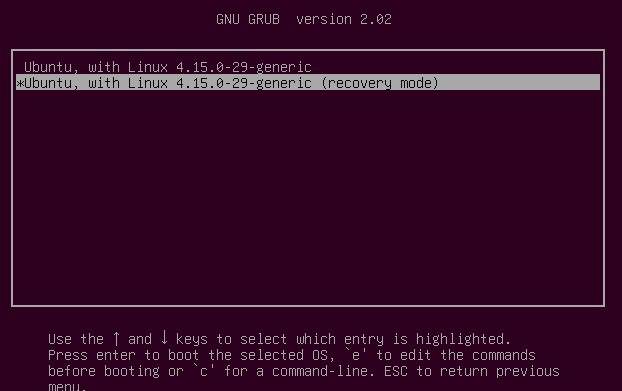
[](https://www.tecmint.com/wp-content/uploads/2018/09/Grub-Advance-Options.png)Grub Advanced OptionsThen choose “**Recovery mode**”.
[](https://www.tecmint.com/wp-content/uploads/2018/09/Select-Linux-Recovery-Mode.png)Select Linux Recovery ModeIn the next menu select “**fsck**”.
[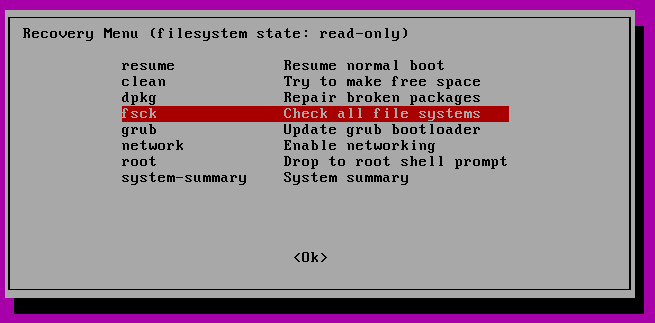](https://www.tecmint.com/wp-content/uploads/2018/09/Select-fsck-Utility.png)Select fsck UtilityYou will be asked if you wish to have your `/` filesystem remounted. Select `“yes”`.
[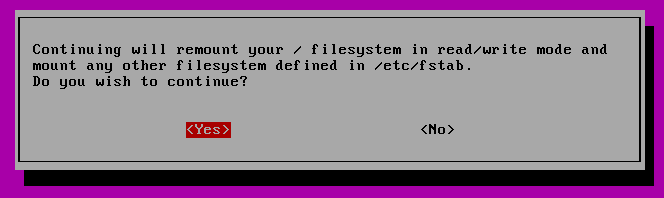](https://www.tecmint.com/wp-content/uploads/2018/09/Confirm-Root-Filesystem.png)Confirm Root FilesystemYou should see something similar to this.
[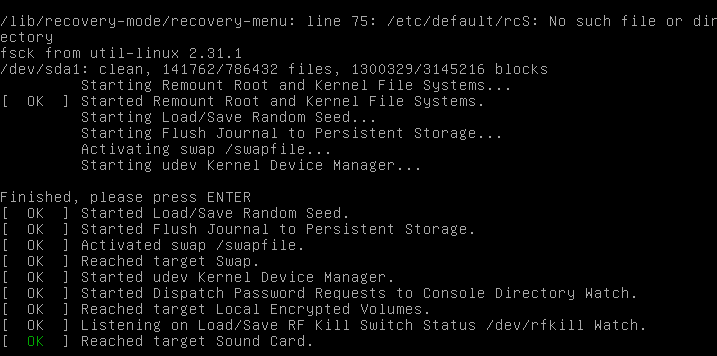](https://www.tecmint.com/wp-content/uploads/2018/09/Running-fsck-Filesystem-Check.png)Running fsck Filesystem CheckYou can then resume normal boot, by selecting **“Resume”**.
[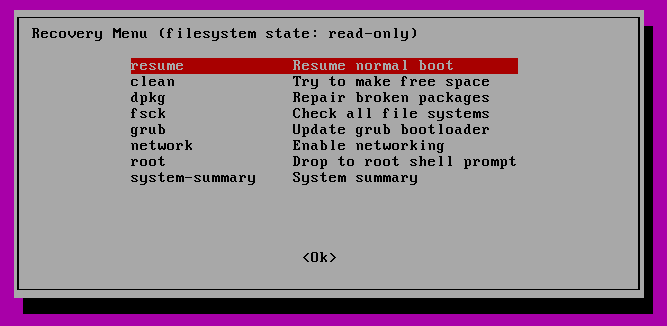](https://www.tecmint.com/wp-content/uploads/2018/09/Select-Normal-Boot.png)Select Normal Boot##### Conclusion
In this tutorial, you learned how to use fsck and run consistency checks on different Linux filesystems. If you have any questions about **fsck**, please do not hesitate to submit them in the comment section below.